
|
|
|
|
|
||||
|
|||||
|
|
|
||||||||
|
Haunts: 2003 Walkthrough Entire 2003 Walkthrough
Since I was only decorating the yard and patio this year, guests were able to see a good portion of the haunt from the street. 
One of my plans was to display a billowing ghost in the upstairs window like I had done in 1999, since it was a relatively simple effect to set up. I used a white button-down shirt and some shredded white fabric on a posable display frame to make the ghost. A fan underneath it made the shirt billow, and I had a bulb-style black light directed towards the ghost. When it got dark, it became apparent that the single black light bulb was not enough to illuminate the ghost well, and I needed to add something else. It was at this time that I found out my extra flourescent black light was burned out, so I grabbed a blue lightbulb that I had picked up at the thrift store a while ago, and experimented with it. Eventually, I ended up putting the blue lightbulb actually inside the ghost with the shirt billowing around it, and it gave an effect better than I could have imagined. 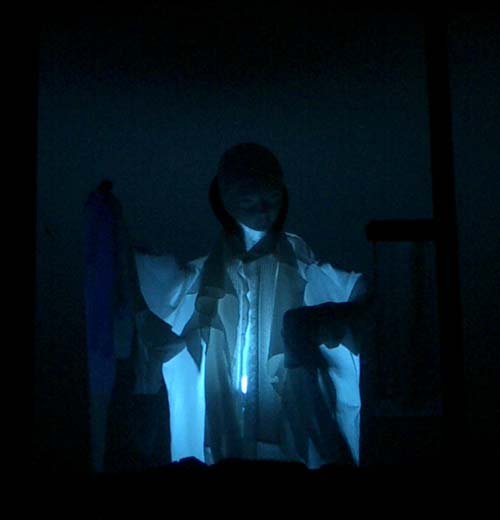


 For the cemetery, I used the tombstones that I had made for my 2001 haunt and stretched a large
mosquito net across the back.
For the cemetery, I used the tombstones that I had made for my 2001 haunt and stretched a large
mosquito net across the back.The plan was to project flying light ghosts onto the mosquito net and add movement to the cemetery scene. Unfortunately, the motor for my mirror ball was broken, and by the time I realized it, it was too late to find an alternative or replacement. Instead, I had to use my holiday projector to project a still picture of a moon and bats onto the netting. 


This year, I was determined to have a working fanimatronic, and I spent a great deal of time trying to fix a partially broken oscillating fan and modify it into a ghoul's head. Once I got the fan part working, I ran into trouble creating a body for it to stand on. I was finally able to stack two boxes and a small trash can in such a way to form the main part of the body, and I used separate lengths of wood leaned against the boxes to form each shoulder and one arm. The robe is simply a large piece of black fabric (used for walls in previous haunts) draped around the box frame. In the end, it worked supurbly and ended up being worth all the trouble. 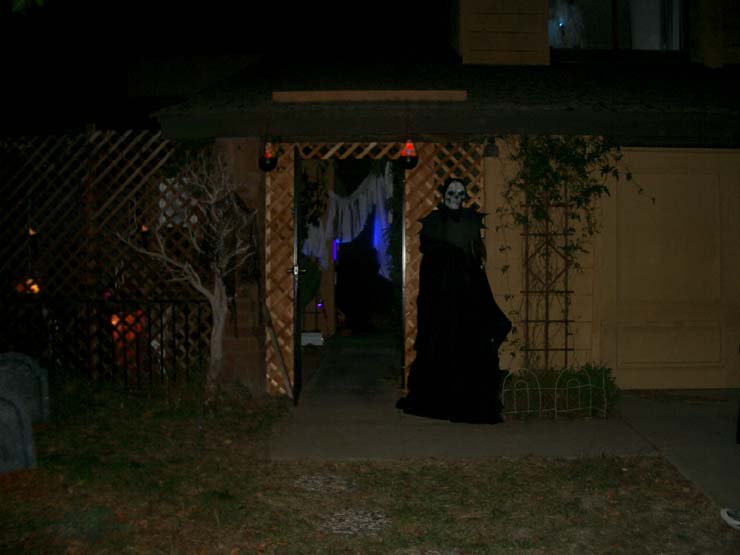
 The grim ghoul stood menacingly at the entrance to our haunt, moving his head from side to side as though he was constantly surveying the area. Dubbed "Dr. No" for the night because of his predictable head movements, the animated ghoul turned out to be a fun prop and certainly proved himself as a worthy addition to the haunt. 
 Also decorating the front gate were four store-bought fake torches - two large ones hanging above the gate, and two smaller ones affixed to the lattice. A dead tree was brought out as a finishing touch. 
Since I didn't want guests to actually approach the door after entering the patio, I needed something that I could position on the porch to make that intention clear. After some experimentation, I decided to go with a hangman effect. 

My original idea was to have a large illuminated sheet behind the hangman so that he would be backlit and silhouetted against the sheet. While I still tried to stick with the main concept of this, I did not have a sheet large enough to achieve my desired effect, and instead, I strung some smaller sheets haphazardly behind the hangman. Several large black lights were used to make these sheets glow as brightly as possible. 


The fortune teller scene defined the look of the inner patio. She sat, solemnly looking ahead and unmoving, at the decorative white iron table in the middle of the patio. Her crystal ball was alive with electricity and a bright red glow from the table illuminated the scene. 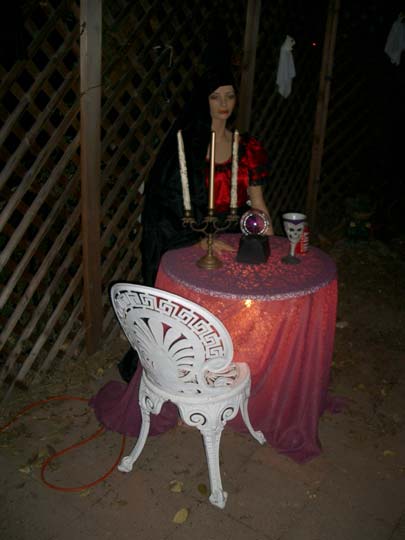


This scene was mainly the work of my mom, who came up with the concept and set it up on Halloween afternoon. I had gotten out our old mannequine in the hopes that I'd be able to use her in a Pepper's Ghost effect. Time and other factors prevented that from becoming, but I still felt I needed to use the mannequine for something. As I worked on other portions of the haunt, my mom set up the fortune teller scene, decorating with a fancy costume and tablecloth. 

As night approached, we realized we needed more lighting to illuminate the scene. We originally set a small, but unbelievably bright light on top of the table. This illuminated the scene, but also killed the eerie atmosphere. I tried putting the light down on the ground, on the chair, and in a number of other places, before I finally came up with the idea to put it under the table. Shining through the tablecloth, the light gave off a wonderful red glow that illuminated the scene and sent scattered shadows across the patio. 
At the entrance to the side yard, one of us would sit and hand out candy to the trick-or-treaters. My entire patio is already enclosed in netting (in order to keep our cats from leaving the yard), and that alone created a nice closed-in look for the patio haunt. From the overhead netting, we tied several lengths of black thread so guests would feel as though they were walking through cobwebs. This was particularly effective since this year the haunt was outside, so it was actually plausible that there might, in fact, really be spiderwebs in the walkway. 

In order to reach the entrance to the side yard, guests would pass the large picture window of my living room. Early on, I had planned to decorate a scene in the living room, but for the sake of simplicity, I ended up just closing the curtains and putting a slow-speed strobe light behind them. I used a fan to add some movement to the scene. Partway through the night, Mike and Victor started going inside and banging on the window as trick-or-treaters passed. Combined with the strobe light backlighting, this actually created a pretty cool effect. Hitting the window was enough to startle some guests, and as the strobe light flashed, trick-or-treaters could catch glimpses of a silhouetted figure against the glass. 


Back |
|
Haunts
|
||||||||
 |
||||||||||
 |
All original content copyright 2004 Raymond Fero |
|
|
Home | Haunts | Effects | Decorations | Costumes | Other | Links | Contact |
