Effects:
 Magic Production Box
The Effect:
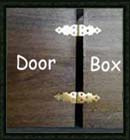
Several trick-or-treaters walk up to the door, where you have an open, empty box on the table.
With an exaggerated motion, you pick up the box, close it, and proceed to pull candy out of it.
Once all the kids have their candy, the box is opened again (still empty) and set back on the
table.
How It Works:
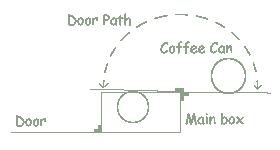
The box has a coffee can secured to the back of one door. When the box is open, that door
conceals the can. When you close the box, you hold the position of that door the same and
swing the rest of the box around until it closes, conceiling the can inside.
Materials:
|
- Lightweight wood (250 square in.)
- 1 12-13 Oz. empty coffee can
- 4 long hinges
- Wood stain (Or paint)
- Glue, nails, hammer, saw
Approximate Cost: $15.00 - $20.00
|
Construction:
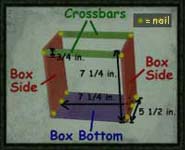
- Cut the wood into 7 pieces. Two of them (The box doors) will be 8 inches long by 7 1/4 inches tall.
Three (The box sides and bottom) will be 5 1/2 inches long by 7 1/4 inches tall. The last two peices
(The crossbars on the box) will be 7 1/4 inches long by about 3/4 inches tall.

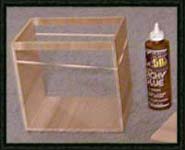
- Glue and nail the pieces together. To do this, first start nails into the flat sides of the unassembled boards
where you are going to want them. Use a good white glue or wood glue (I used Tacky glue) to glue
the peices together. The pieces can be held in place with a rubber band while the glue is drying.
After the glue has dried, you are ready to nail the peices together for extra strength. Starting with the nails in the holes that you made earlier,
continue to hammer the nails through, into the thin edges of the wood. Use 3 nails to hold each side to the bottom,
and 1 for each side of each crossbar. Do not worry about the box doors at this point.
- Stain or paint the wood. If you are using a wood stain, make sure you use something to seal it, like polyurithane, so the stain
will last. Stain or paint the box doors, as well, although keep them separate from the
box.
- Attach the box doors using your long hinges. Note that both doors need to be able to swing
a full 180 degrees.
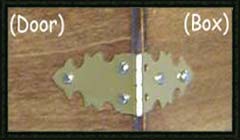
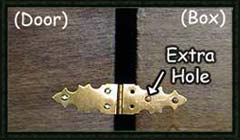
 To attach the hinges, first place the door flat against the box covering
the opening (In its "closed" position). Note that you will not be able to use all of the
hinge's holes when attaching it to the main box. Mark a spot on the hinge where it still covers
the main box and punch a new hole here. Now, again place the door flat against the box in
its "closed" position, and attach the hinges. Do this again for the second door. When the hinges
are in place, there should be a slight gap between the door and the box when it is open, and
the door should fit tightly against the box when it is closed. Both doors should have 180 degrees
of movement.
To attach the hinges, first place the door flat against the box covering
the opening (In its "closed" position). Note that you will not be able to use all of the
hinge's holes when attaching it to the main box. Mark a spot on the hinge where it still covers
the main box and punch a new hole here. Now, again place the door flat against the box in
its "closed" position, and attach the hinges. Do this again for the second door. When the hinges
are in place, there should be a slight gap between the door and the box when it is open, and
the door should fit tightly against the box when it is closed. Both doors should have 180 degrees
of movement.
Closed (Attach hinges in this position):
Open (Note the gap):
- Prepare the coffee can for attachment by cutting the top off so that the can is only about 4
inches tall. This is so the door will be able to hide it. It may be a good idea to wrap
some electrical tape around the top of the can so you do not cut yourself when reaching
in. I would also recommend painting the can black. Although nobody is supposed to see the
can, this makes it less noticeable and prevents mistakes in the presentation.
- Now you're going to need to attach the coffee can to the back of the door. There are
several possibilities, depending on how much more work you want to do and how much stress your
magic box will be under.
- Hot glue will work for a temporary attachment, but will not hold up to much stress.
- Double sided tape is even less reliable than hot glue, but it will work in a crunch.
- For another easy attachment possibility, you can slit a small hole in the bottom of the can near the edge.
Run some duct tape through this hole and up through the can. Now, secure that strip of tape
at both the top an bottom of the can with additional tape. Make sure that this is not too
close to the edge of the door to be visable to your guests.
- If you really want something that will last, cut a slit in the bottom of the
can. Now, take a thin metal strip and run it through the can so that it sticks out a little
from the top and the slit in the bottom. Using very small screws, attach this metal strip
to the door. (You will have had to pierce holes in the strip beforehand.)
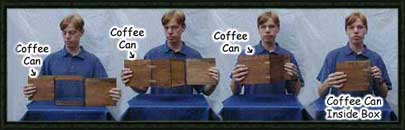
Preparation and Performance
Load the coffee can up with small candy before your guests arrive. You will most likely need to refill it
several times throughout the night. Do this when no one is watching. Have the box on the table
when guests walk in. It should be open so that both door are open a full 180 degrees. Pick up the box by holding the edges of the doors in your hands. Your right hand should
hold the door concealing the coffee can. Keeping the door with the coffee can facing your
guests, bring your hands together. The box will swing around 180 degrees while the doors
do not move much at all. This will close the box with the coffee can inside. Hand out some
candy, reopen the box in the same manner in which you closed it, and set it open on the
table. You are now ready for the next group of trick-or-treaters.
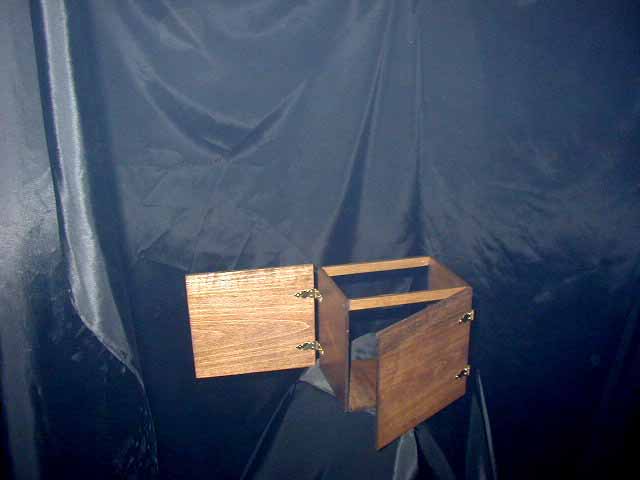
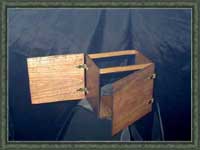
The Completed Box:

Animated GIF of Magic Candy Production Box
(4.4 Mb File will take approximately 14 minutes to download on a 56K modem)
Back

|
|
Effects
|